I had been writing this post for here but Bell of Lost Souls has a hobby article shopping spree contest going on so I'm posting it both places. If you want to support my plastic crack addition please vote over on the Bell of Lost Souls lounge for this hobby thread. It will be broken into a couple seperate posts there with all the same images (linked from here) and dialog.
Well I was going to do this for my personal blog but figured
I might as well do this on Bell of Lost Souls as well if there is a chance to
win some free miniatures. Ah the power
of free.
I’m a big believer in free, or at the very least cheap, so I’m
going to show you guys a pretty easy and relatively cost effective way to make
some miniatures icons for your armies.
We are going to be using a single piece of software for
this, Sketchup. Sketchup has a free and
a paid version, anything the paid version can do can also be done with the free
version and a community created plugin. This makes sketchup very versatile even
with out paying the 500 bucks for the “professional verson”. In the
past I’ve covered plugins on my blog to help people track down what they need
to maximize their efficiency in sketchup.
You can find the blog post here,
http://dynath.blogspot.com/2012/03/building-miniatures-in-sketchup.html.
We will also be using an 3d printing service called
shapeways found here,
http://www.shapeways.com.
Shapeways is a community and sales site centered around customer created 3d
printable objects. The price of shapeways products is set by the person that
makes the object but ordering your own products for yourself will only cost you
the actual production costs. While 3d printing can become quite expensive for
large objects, small items like miniature bits are easy to make and cheap to
order.
In this I’m going to show you how to make the master model
for an icon plate. This works very well
for space marine armies but could also be used for any force icon.
First of course download and install Sketchup. I’ve also
installed all of the plugins found in the blog post I’ve linked above.
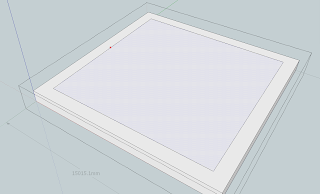
Step 1: the background
Icons are easiest to mount if you put them on a
background. In this case I’m going to
build a basic base that I can reuse. I
start by making a square. Using the
rectangle tool I drag out a square, when dragging the dashed line across the
center tells you when you are making a square or a golden section.
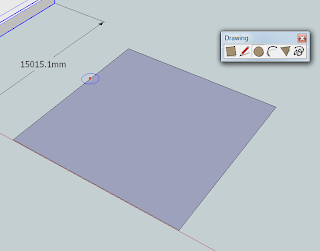
If you look at the bottom right corner in the info box you’ll
see the size of the item I’m working with.
The square I started with is about 1000 millimeters. This is too small. Sketchup is designed to work with architecture
so it can have some trouble when you make really small items. So we need to work at a larger scale and then
shrink the model down before we export it.
I like to work at 1000 times the final size. It’s is large enough I
rarely have problems with geometry and the math for scaling is easy to figure
out.
Here I’ve put some measuring lines on the square so we can
see the size. Then, with the square
selected, I’ve selected the “Scale Tool”.
This puts little green handles around the sides of the object. Then by dragging I can resize the
square. In this case I wanted to make a
square that when output will be 15mm on each side. So I drug the scale handle until the square
has a size of about 15,000mm on each side.
Precision is not totally necessary but it helps.
Well we have a nice two dimensional square but we need to
have some depth to make a 3d model. So
we are going to choose yet another tool, the “Push/Pull tool”. If we choose that tool, and then left click
on a flat surface it can push or pull the surface out giving it thickness. Watch the bottom left corner of the screen to
determine how far you are pulling it. I
want the plate to be about 1mm thick so I’m making the larger model 1000mm tall
approximately.
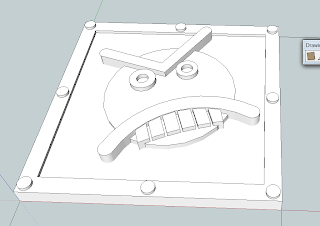
Now we have a nice square background for our model. We can select it and make it a group so it
doen’t get lost. Of course GW put some
of their icons (on the drop pod sprues) on squares and circles and they are
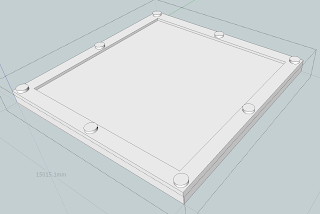
pretty boring so let’s fancy this up a bit.
Double click on our group to open it up.
Then select the “offset tool” this lets us click on a surface to offset
a line inside that surface. In this case
I want to drop a line about 1000mm from the outside edge of our square.
Now I’m going to use the “Push/pull tool” to push the
surface in about 200mm. this will make
the total thickness in the middle of the plate about 0.8mm when done. Shapeway has different materials with
different minimum thicknesses so be aware of what your limits are for the
material you want to print in. I usually
use Frosted Detail. It has lots of detail for miniatures and a 0.5mm minimum
thickness so the thickness I just set it at is about perfect for a sturdy
plastic plate. Now lets add some rivits
along the outside edge. If you hover
over the center of a line or shape a white dot will appear marking the
center. You can click on it with a tool
to use it as an anchor. You can do the
same for existing points where a green dot will appear. So using the “Line tool” find the center and
corners of the outside edge and drag lines in so you have reference points. Then switch to the “Circle tool” find the center point of your lines and you
can use it as the center of a circle.
Then using the “Eraser tool” you can remove the reference line. Lastly go back to your “Push/Pull tool” to
pull the circles out making 200mm tall rivets around the rim of your plate.
Step 2: The icon
So now we have our base plate, it’s scaled correctly, and it
looks fancy. So now we need an icon to
put on the plate. Sketchup has a bunch
of basic drawing tools you can use to draw shapes. Here I’ve drawn a new square and I’ve pulled
out the drawing tools so you can see the pallet.
Aside: I will warn sketchup’s
drawing tools are very limited so you might be inclined to use a separate
program to design your icon. Your best
option for making geometry from an external file is to use a vector art software
that can export DXF or DWF files. These are specific 2d vector formats Sketchup
can process. Doing an image in MS paint
won’t be any help. I own Adobe Illustrator
which works for this but is very pricy. There are a number of free alternatives
out there, check out Wikipedia or ask for recommendations from graphic artists
if you can. An added advantage of separate programs like Illustrator is that
they can often convert a raster image to a vector allowing you to use your own
sketches or found images as the basis for your icon.
We now need to make our icon. I’m a huge fan of the custom
space marine chapter “the angry marines” so let’s make an angry marine icon. Angry faces aren’t hard to make, they start
with a circle. So find the center of
your square by drawing an X from corner to corner then draw out a large
circle. Using the X as a reference point
draw in eyes. Then add horizontal reference bars to draw out a wide V on the
forehead as a brow, and then a wide curve on the lower half as a frown. I’ve added teeth hanging down below the frown
to make it look meaner. Below you’ll
find images with my reference lines and after I’ve removed them.
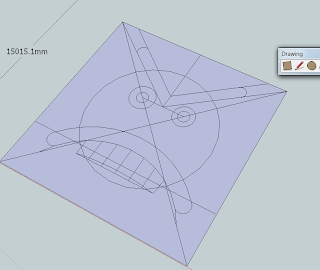
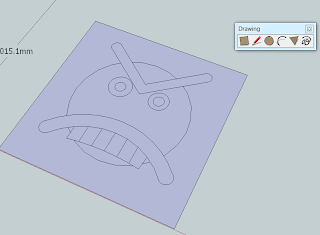
The angry marines icon isn’t really clever or detailed just
a very angry, sort of goofy looking face.
Making your own custom icon might require a lot more detail. When working on an icon remember to think in
3 dimensions. All your lines have to
have thickness and form a picture that can be made in relief. So if you look at, say the lines separating the
teeth I drew, you will notice they won’t come out in 3d. You might have to work on that a bit to get
things to come out how you want. In this
case I’ll go to the offset tool and shrink the teeth a bit to make them work as
intended.
Now we can use the “Push/Pull tool” to give the icon
depth. I work from the deepest part down
so I’ll pull the brow and frown out first. Then the eyes and teeth. And lastly
the face itself. The 3d model is now a
relief all that’s left is to cap the bottom of the relief which is currently
open and then remove any excess geometry.
Adding a line at the bottom of the relief will seal the model and you
can erase excess lines around the outside of the model.
On a more complex icon you might want to make each of these
parts a separate piece so you can move them around and scale them separately. This can be necessary when working in
specific circumstances such as when making icons on rounded surfaces. In those instances you’d draw each level of
the relief separately. Like show below, then pull each one out to give them
depth. Once layered on top of each other
it’s no different than building them as one piece.
Step 3: put it all together
To complete our icon plate just put our relief icon on top
of our base plate. This gives us the 3d
model we want of an icon plate suitable for slapping on a vehicle or building.
At this point we have a fantastic relief of the icon on a
base plate but it’s 1000 times the size we need it at. So again we use the “scale tool” this time
selecting the entire completed icon and then the “scale tool”
Now we need to export it. Most 3d printing sites need a
specific format of output file, usually Stereolithography files or STLs. Shapeways is no exception. For that we need to use an STL export plugin
provided by the Sketchup community. You can find it linked from my earlier blog
post. Select your completed model and go
to “Plugins”. Now choose “Export STL
file”. It will launch a dialog box to choose the size of your stl, select “millimeters”
and it will then ask you where to save the file.
Step 4: Shapeways order
If you’ve done everything the file you exported will be
print ready. You can start a shapeways account and upload the file there to
order for yourself. If you get an error when you try to purchase
shapeways will give you feedback on what to fix. I’ve done some advise articles
on this process on my blog and the shapeways community is fantastic for helping
people sort out issues.
If you are interested later this week on my blog “dynath.blogspot.com”
I will be demonstrating how this same process can be used to make other items
such as shoulder pads.
Thank you and I shamelessly say “Vote for me”
Disclaimer: Warning reproduction of copyrighted designs
constitutes intellectual property rights infringement. I neither condone nor
suggest that you use these methods for such purposes. I am not a representative of Trimble Inc.
owners of Sketchup and all associated marks nor a representative of
Shapeways.com owner of their associated marks.
Nor, and I can’t stress this enough, am I a representative of Games
Workshop or representing their interests.


