So I promised some time ago I’d show you how to make
shoulder pads. I’ve totally given up on
the bell of lost souls contest so I’m just tossing this to my loyal followers
on the blog. I don’t have finished
product pictures of my icons which just makes people a bit leery. Couple that with the fact 3d design is a bit
out of reach for the less tech savvy and you get a lot of people skimmed my
tutorial but very few commented. Doesn’t
matter I don’t do this stuff to get money I do it because I enjoy it.
So shoulder pads
Now one quick disclaimer.
According to the depositions of the Chapterhouse Studios vs Games
Workshop legal battle, Games Workshop claims copyright over the shape of
shoulder pads. The judge has ruled in summary judgment that it is possible that
GW can own the copyright. Now this means
two things, one that GW might own the shape of shoulder pads, IE a quarter
ovoid with a raised rim, and two that CH must yet present evidence that implies
otherwise. Basically the shape of the
shoulder pad is currently in contention.
As such if a person makes their own shoulder pads it may or may not be
copyright infringement at this time.
Anyway let’s start with a sphere. I’ve installed a free plugin called SCF Draw
Tools. It allows me to make shapes
without the trouble of using the extrude or follow me functions that are
normally needed to make a 2d shape a 3d object. Here I’ve started from a center
point to make the sphere.


I’ve made the sphere approximately 8500 millimeters in
diameter when scaled that will be 8.5mm.
Of course a shoulder pad isn’t a sphere. Its an ovoid, its
taller than it is wide. So we stretch it using the scale tool. By grabbing the center handle and holding
shift we can scale evenly along the axis.
Scaling up my 1.5 times should be about right.

Now obviously we need to break this down. A shoulder pad is not a full ovoid, its one
quarter of an ovoid. So we need to make this a quarter. Now we are going to do this the hard way. The Pro Version of Sketchup has these nice
Boolean tools that let you intersect or union solid objects. But I want to show you the freeway to do
this. Let’s hope one day Trimble puts the boolean tools into the free
version. Till then we do things the hard
way.
So join the ovoid into a group so it doesn’t interfere with
the new geometry we are about to make.
And just to be safe lets hide it.
Now with the rectangle tool, starting at the center point of the axis,
drag out a rectangle larger than the ovoid. Then use the extrude tool to make
it a 3d rectangle. I like to do things in mirror so my shape rectangle only
covers 1/8th the ovoid. This lets me modify one side of it and then
mirror it down the center. It’s just lazier but it works.

Ok so now we have our two shapes but we need to intersect
them. We can do so by selecting the two
objects and explode the two groups. Once they are no longer grouped select them
then right click and choose “intersect faces with selection” Now if we look at it transparent you’ll see
the all the geometry is still present. But now where the two shapes overlap
there are seems that we want to keep. We just need to delete the excess
geometry we don’t want.

We go in with the eraser tool and remove the parts we don’t
want. This process isn’t necessary with
the boolean tools in the Pro version but its not really worth the extra cost.
There are some free plugins that offer versions of the boolean tools but I’ve
never had good luck with them and since I have the Pro version I’ve never
needed them.


Now we have the segment of the shoulder pad we need. But we still need two things, the back needs
hollowed to fit the arm, and the front needs a rim around the edge. So lets
start with the hollow in the back. Group
the item again and then copy it. Now use
the “paste in place” function to put it back where it was. Then switch to the scale function. Using the corner handle scale it down so its
slightly smaller. You may have to play
with it to size it correctly. Once you
have it how you want once more explode the shapes and intersect faces again.


Now we have the hollow shape so we can make the rim. Start by copying the hollowed shape again.
Then use the “paste in place” function.
Once you’ve done that use the scale tool just like before but scale it
up so its larger than the original shape.

So now we need to take the center of the shape out to make
it a rim. We’ll use the same method we
used before to do so. Make a rectangular
3d object that is again larger than the original shape. Now select the bottom and vertical edges use
the “offset” tool on the side. Then use
the push pull tool to remove the main part and make an “L” shape. Now we can combine the enlarged pad shape and
the L to make the rim. Once more using
the explode and Intersect faces commands we can get the desired result.


At this point we have half a shoulder pad shape. If we first select the geometry and tap the “control”
key while using the move tool we can duplicate the design easily. Then with the new geometry selected right
click and choose “Flip Along” and select the appropriate axis. Now just drag the geometry together so it is
seemless. At this juncture you can combine
the two halves of the main body and the two halves of the rim together. It’s important to keep the body of the pad
and the rim of the pad separate for now.

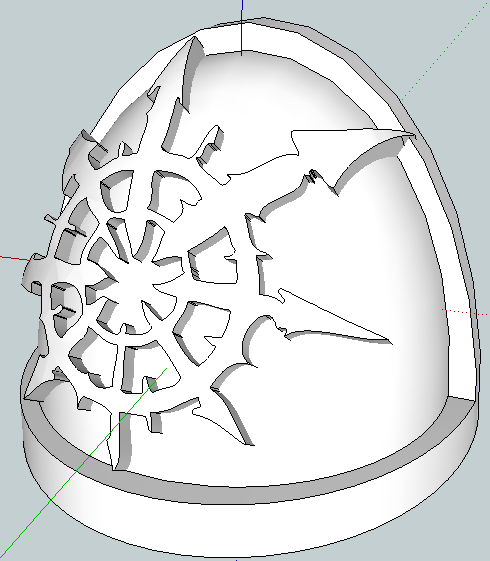
Now we need to start on the icon for the shoulder pad. To do so we need a plate that we will cut the
icon out of. We get this from copying
the body of the shoulder pad, pasting it in place, and then enlarging it. Here I’ve scaled the plate using the scale
tool so its just slightly smaller than the rim I made. Don’t worry about the overhang
at the back and bottom of the pad we’ll deal with that after we make our icon.

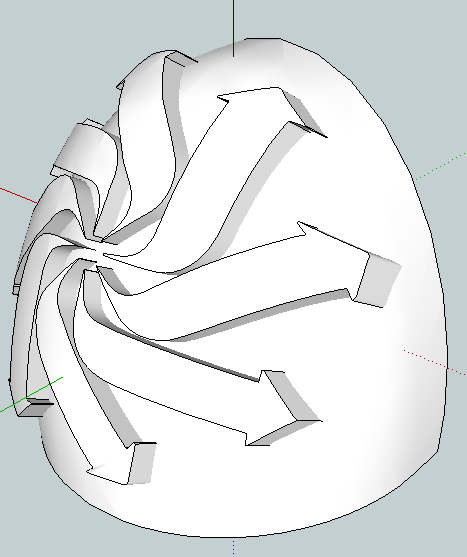
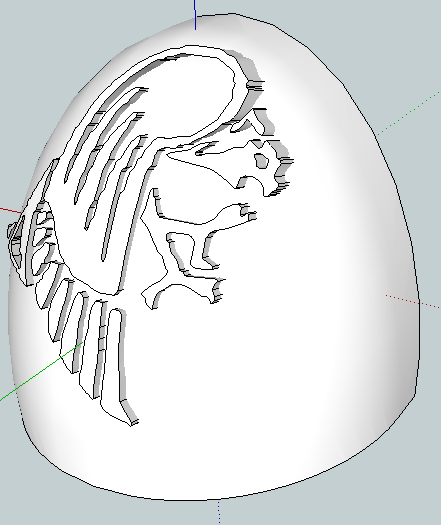
Now we need the icon itself.
Remember last time how I said keeping the different layers of the icon separate
would be helpful. This is where it will
be helpful. In this case we have 3
layers. We are going to use each of
these 3 layers as a cookie cutter to stamp out a layer for our icon.

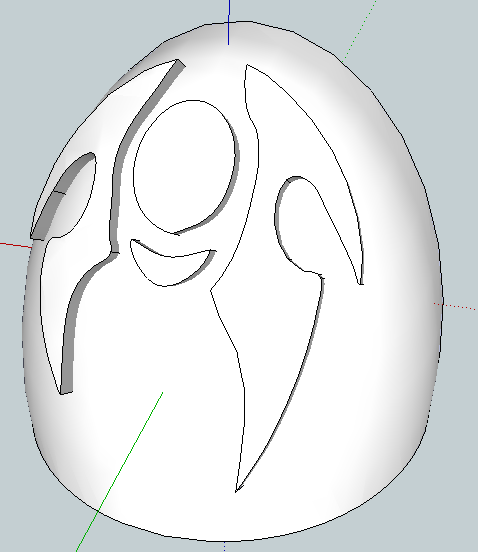
To start put the 3 icons together like you’d want them to
display. Then using the move tool move
them so they are centered around the same axis we are using to build our
shoulder pad. Once in place use the scale
tool to stretch them so they are tall enough to pass through the shoulder
pad. Now we go back to the move
tool. When you select a single part with
the move tool, you’ll see 4 “x” shaped points appear on each face. If we then
select one it will allow us to rotate around the center of the object. Rotate each layer of the icon so it goes
through the face of the shoulder pad as shown below.

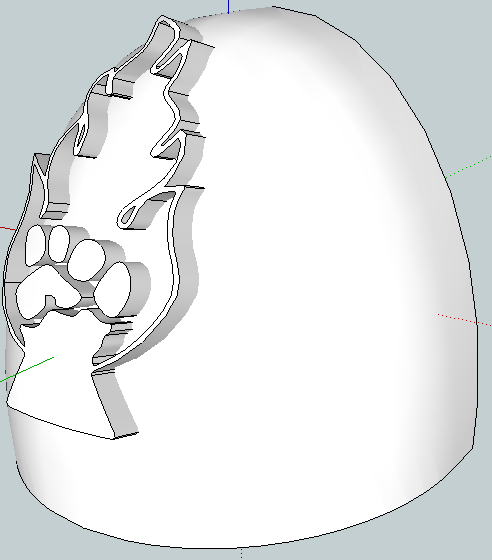
At this juncture we need to follow the same process we used
before. First copy the plate. Now select
one of the icon layers and explode it and the plate. Now intersect with
selection and remove the excess geometry.

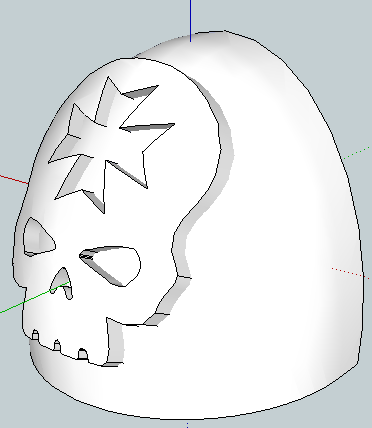
Once we have all the junk out of the way make the new shape
a group and then paste the plate back in place so you can do the same thing to
the other two icon parts. Her we can see
all 3 layers of the icon as their own rounded plate, while working I’ve hidden
my shoulder pad body and rim so it’s not in the way.

We can now use the move tool to offset the layers giving
them some relief to the design. Select
the layers you want to move, then select the move tool. Now hold the shift key
to move the layers along an axis. Here I’ve
move it slightly along the green axis and blue axis to have this result.

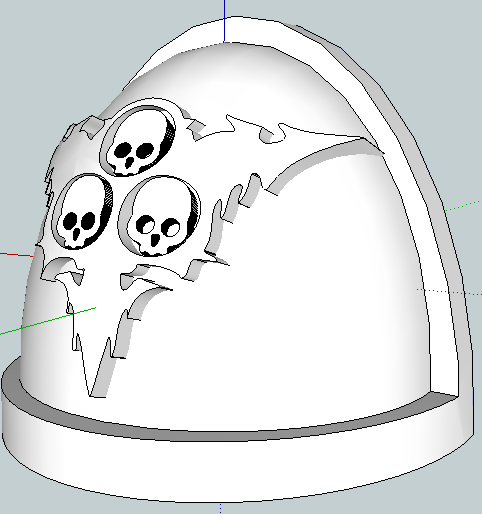
Now we have a complete shoulder pad. At this point if we have followed these steps
our pad is complete. This multi-part file should print OK, but for the best results you should join all the faces and remove the internal geometry so its all one piece. But if we want we can copy it to make multiples pads in a single file. We can rotate
it to change orientation and so on. Here
I’ve duplicated the shoulder so it has 10 copies in a single file. Now I can
scale it down by 1000% and use the STL export plugin to output it for
shapeways.

Here are a couple pieces of advice to help new 3d modelers
along. When I was first starting out the biggest problem I had was leaving
geometry inside a model. See when you
make an STL and upload it for printing on Shapeways the process will combine
each separate group into a “Shell” the shell has to be “watertight” in order
for it to print. That’s a fancy way of
saying it has to be a solid 3d object. Orphaned
geometry hanging around either inside or outside a solid object will become its
own shell because it’s not connected to anything. But it’s a shell that can’t be printed
because it’s not solid, it has a front but no back. This means your
print attempt will fail. So it’s always
a good idea to double check by going into each group and unhiding everything
and removing the orphaned edges you might have missed. The other problem I consistently had was
what many at Shapeways call the “Wall thickness Lottery”. Each material has specific rules regarding
minimum thicknesses it can print in.
Unfortunately it’s very easy to have these thicknesses rejected if they
are really close to the limitations. Be
mindful of your target material’s requirements and if necessary ask advise on
the forums for guidance on how to resolve the issues you are having. The shapeways community is quite friendly and
willing to help.